
Table of Contents
- Booklet printing / "Multiple pages per sheet" ("N-up")
- Default printer options: Set your own!
- Images and graphics: Correctly embedded
- "Multiple pages per sheet" ("N-up") / Booklet printing
- PowerPoint: Optimizing print quality of images/graphics
- Tiling - combine several small PDFs/copies into one large format
- TrueType & special fonts (decorative fonts, symbols, etc.)
Images and graphics: Correctly embedded
Problem:
Often, documents with a large number of images or graphics cannot be printed (RIP process aborts) or individual characters or entire text sections/image objects are missing on the printout. Typical examples are unusually large PDF files with a page size of ≥ 0.5 MB/page and more than 100 pages. Read more...
Cause:
The document contains a large number of images/graphics from high-quality digital cameras or other sources, whose data volume is (probably...) much too high, regardless of the printing requirements (printer resolution, size of the image object on the document page, etc.). Since the central printers have to store the raster data of the entire document for performance reasons, the RAM available for ripping (approx. 3.3 GB) is then relatively quickly exhausted and the printing process is aborted.
Solution:
There are three possible solutions. In all cases, you will need a PDF printer driver such as PDF24 or PDFCreator (Windows), PDFwriter for Mac (Apple Mac) or CUPS-PDF (Linux) (see FAQ → (Tools & Drivers →) PDF Printer). Before you begin, you should first adjust the conversion and compression values of the PDF printer. To do this, proceed as follows:
- Adjust PDF printer parameters
- Open the application of the installed PDF printer and select the profile for high-quality printing in the configuration menu. ("High Quality", "Hohe Qualität" etc.)
- Adjust the conversion and compression values for black & white, greyscale and colour images/graphics so that all font and raster objects are calculated at a maximum resolution of 600 dpi (method: sample).
- Save the changes
You then select one of the three revision measures:
- Regenerate/revise PDF
- Open the original document in its application or the existing PDF in Adobe Reader..
- Create a new PDF with the changed printer settings of the PDF printer.
- Send the (hopefully) smaller PDF to the printer.
- Split PDF into partial jobs
- Open the PDF in Adobe Reader and use the PDF printer to print a maximum of 50 pages of your document into a new PDF. Repeat this process for the rest of the document. If you use the "Multiple pages per sheet" (“N-Up”) option, select the number of pages per partial job so that the value can be divided by your "N-Up" value to avoid blank spaces on the front or back.
- Revise original document
To convert images/graphics to a specific size format and then save them in a suitable graphics format, you can use a program such as IrfanView, which automatically converts and saves large quantities of image/graphics files in batch mode. The info window also allows you to determine in advance what print size an image will have depending on the selected resolution (dpi). (see FAQ → (Tools & Drivers →) IrfanView).- If you don't know the exact dimensions of the object you want to embed, first figure out the approximate size you want for each object (better to go a bit bigger than needed) and/or create a new image with the desired print dimensions from the original image template, keeping in mind a printer resolution of 600 dpi. Save the new image object in a suitable image format (photorealistic images as JPEG/JPG with max. 95 % quality, graphic objects with hard contours (text, lines, single-color areas) as PNG).
- Insert the newly created objects into your document and, if necessary, adjust the object size to the desired value (never enlarge again, but always reduce the size of the imported object, hence the recommendation above to make it "slightly larger than necessary").
- Create a new PDF using the PDF printer.
Tiling - combine several small PDFs/copies into one large format
 Tiling is particularly useful for templates with a short side edge length ≤ 449 mm (e.g., A2 or smaller), as single printouts do not make optimal use of the available paper width (899 mm) and also require more paper length (approx. +270 mm) due to the addition of a header and footer. In addition, printing takes longer due to nozzle cleaning and repositioning.
The PDFs alone are sufficient for tiling! However, it would be advantageous to frame the individual tiles in advance on the drawing/poster surface with fine (0.5 pt), light gray cutting lines (shown in red in the image). This makes it easier to cut the tiles. Read more...
Procedure using the example of an A2 template:
If the required tool (PDF24 or similar; FAQ → (Tools & Drivers) → PDF Printer Driver) is already installed, the maximum of 3 steps can be completed quickly:
- Save template(s):
Place all templates (of the same format!) in an empty directory. If you want to print multiple copies of one template, place as many copies of your template in the directory as you want copies. To avoid overwriting the files, the individual file names must be extended, e.g.,filename_1.pdf, filename_2.pdf, etc.
- Combine all individual files into one PDF file:
Open the PDF24 application and load all files from the above directory into the program. If you have different templates, you can change the order. Click on "Save" / 💾 to receive a new PDF file.
- Create new A0 (841x1189mm) large PDF:
Open the new PDF and select the PDF24 printer or another PDF printer from the Print menu. Now proceed as follows (Note: 3.1 and 3.2 differ only in two values shown in italics):
3.1 A2 template is portrait format:
Select the following options/values in the printer properties:- "Properties" → "Layout" → "Alignment": Landscape
- "Properties" → "Advanced..." → "Paper Size": Custom page size for PostScript:
- In the new window, set the unit to mm and enter the following values/options. Pay attention to "." as the decimal separator.:
- "Width": 841.00
- "Hight": 1189.00
- Paper feed direction: Short edge first
- Confirm 3 times with "OK"
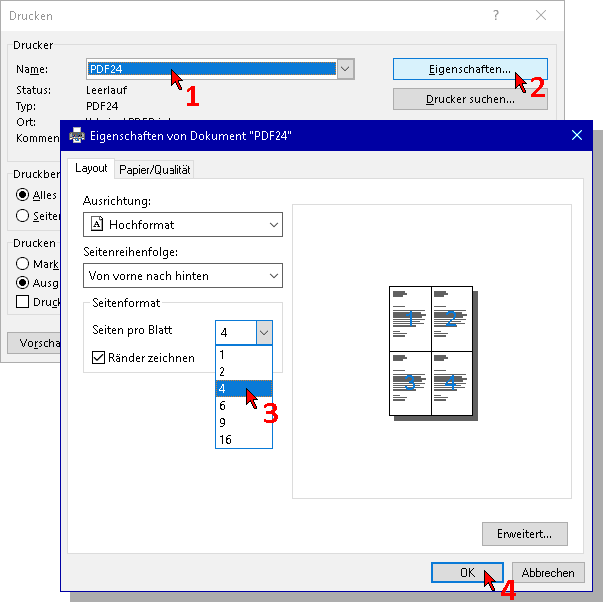
- In the Print main menu → “Customize page and options”: Multiple
- In the new window, enter:
- "Pages per sheet": Custom 2 x 1
- "Page layout": Horizontal
- In the new window, enter:
- Create a new PDF from the newly formatted document using "Print" and send it to the large format printer.
Select the following options/values in the printer properties:- "Properties" → "Layout" → "Alignment": Portrait
- "Properties" → "Advanced..." → "Paper Size": Custom page size for PostScript:
- In the new window, set the unit to mm and enter the following values/options. Pay attention to "." as the decimal separator.:
- "Width": 841.00
- "Hight": 1189.00
- Paper feed direction: Short edge first
- Confirm 3 times with "OK"
- In the Print main menu → “Customize page and options”: Multiple
- In the new window, enter:
- "Pages per sheet": Custom 1 x 2
- "Page layout": Horizontal
- In the new window, enter:
- Create a new PDF from the newly formatted document using "Print" and send it to the large format printer.
"Multiple pages per sheet" ("N-up") / Booklet printing
Various problems with different causes occur in connection with the “Multiple pages per sheet” (“N-up”) and “Booklet printing” options:
- Missing or incorrect characters / embedded objects... Read more...
Problem:
Combining several logical pages onto one print page often results in losses in the print image (characters are missing/replaced by boxes, embedded objects are missing entirely or are printed incorrectly).
Cause:
Depending on the complexity of the document, print processing can generate several gigabytes of data, which can overload the printer's memory. This option should therefore only be used with caution on physical printers, taking the following information into account in order to obtain a satisfactory printout...
Note: Before printing large documents or multiple copies, it is essential to print a test copy that includes all relevant print parameters to be applied to the entire document (e.g., number of logical pages on a page/sheet for double-sided printing, reading direction (left to right/top to bottom, etc.). Ideally, a new PDF should be created so that the layout can be checked before it is sent to the printer.
Solution:
There are two possible solutions, the first of which should be tried first:
- Use PDF24, PDFCreator, PDFwriter or similar (see FAQ → (Tools & Drivers →) PDF Printer Driver) to create a new PDF in which the desired page layout is already implemented (multiple pages per sheet, "N-up"). Check the result, especially on the last pages of the new PDF.
Now send this PDF to the printer using the default options. - If the above procedure does not work, proceed as follows:
Print the document in smaller sections (pages 1–48, pages 49–96, etc.).
DIdeally, the partial jobs should not have more print data than the original document, i.e., for "2 on 1", only half the original number of pages, for "4 on 1", a quarter, etc. Please note that the number of pages in each partial job must be divisible by the number of "pages per sheet" so that all partial fields (tiles) are filled.
Note: The term "pages per sheet" is not always precise, as PDF files do not support double-sided printing, so it should actually be "multiple pages per page". For "4 on 1" and double-sided printing, the page count of the partial jobs should therefore be divisible by 8 , e.g., pages 1–48, pages 49–96, etc.! Check the results of the partial jobs, especially the last pages of the new PDFs!
It is not possible to give an exact figure for the maximum number of pages, as this depends on the structure of the document (predominantly text ↔ many embedded objects). Normally formatted documents ("1 to 1") should not exceed 400 pages.
Depending on the application, this option can be found in different locations in the "Print" menu.
Acrobat Reader, Foxit Reader

MS-Word

Firefox, MS-Excel, MS-PowerPoint etc.
- No printout when using these options... Read more...
Problem:
PDFs are often protected by the author with security features such as Document compilation = not allowed or Page removal = not allowed. This means that if the page layout is changed using the above options, the document can be sent but will not be printed (status Error)..
Solution:
A solution is provided under "No output → No print output for protected PDF files".
PowerPoint: Optimizing the print quality of images/graphics
Problem:
Objects embedded in PowerPoint (PP) (images, PDFs, etc.) are embedded with low resolution by default; this is sufficient for screen display but not for high-quality printing. Read more...
Cause/Solution:
There are several reasons for this:
- Incorrect print parameters:
In the PP print menu, under "Full-page slides>", select the "High quality" option. - Embedded PDFs:
When embedding PDFs in PP slides, they are re-rasterized with very low quality. This problem can only be solved by incorporating the original text and image content from which the PDF was originally created. If you have this source, you should also use it in the PP slide.
TrueType and special fonts (decorative fonts, symbols, etc.)
Problem:
Often, special characters (decorative fonts, symbols in mathematical formulas, etc.) cannot be printed as desired... Read more...
Cause:
...because the printer does not have access to the author's application and computer.
Exotic (Windows TrueType) fonts (TTFonts) are usually not supported on PostScript or standalone printers. The printer then uses the most suitable (PS) font, which usually does not produce the desired typeface.
Solution:
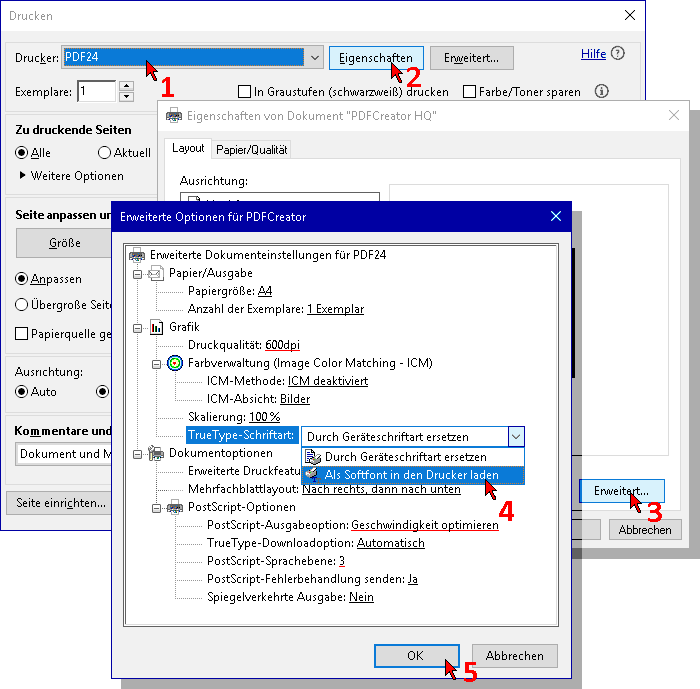
Embed the fonts used in the document. To do this, select the following option in the "Print" menu of the P&P central printer or a PDF printer (recommended for all documents that are to be distributed and/or printed at different locations/printers or from a USB stick, etc.)
Note: In the “Adobe PDF” printer settings, embedding is enabled in the "High-quality printing" and "Print output quality" options:
Properties → Advanced... → Graphics → TrueType font: Load as soft font in printer, OK
Options underlined in red: Additional parameters that we recommend for using our printers!
For information on permanently applying personalized printer options, please also read the article Default printer options - set your own!
Default printer options: Set your own!
Redirected from “Personalize printer options”
Redirected from “Set permanent printer options”
Problem:
System defaults do not always match your preferences, and constantly adjusting device options such as “single/double-sided printing,” “stapling: yes/no,” or PDF creation options (“TrueType fonts”) is tedious. With a few simple steps, you can define other options as the new default ... Read more...
Background:
While printer functions of real printers are used variably depending on the job, software manufacturers of PDF printers invariably aim for the smallest possible files instead of maximum portable PDFs! The print image of PDFs printed on external computers or directly via a printer's USB port may not meet expectations; the external PC may not have the same resources as the author's PC, or the USB printer may not be able to access them (special fonts, other information)!
Personalized settings can be made on any printer and temporarily changed for the current print job in the Print menu.
Solution:
In the example, the PDF24 printer is customized to generate maximally portable PDFs by embedding the TrueType fonts used in the document and other options, but settings for stapling, single/double-sided printing, etc. can also be customized on the corresponding printers:
- Open the Start menu and type "Printers & Scanners"..., ...select the app offered
- In the new window, select PDF24 (or another (PDF) printer) and choose "Manage".
- In the new window, select "Printer Properties" and go to the following options in the next window:
- () General → (1) Settings... → (2) Advanced... → ...
- → Graphics → (3) TrueType font: Load as soft font in the printer
- → Document Options → PostScript Options → (4) PostScript Output Options: Optimize Speed
Options underlined in red: Additional parameters that we recommend for using our printers.
